Here is are Shot by Shot Final Product for the remake of Collateral.
Overall as a group will think we did well with this project considering it was are first time filming as a group and using Final Cut Pro for editing. Also we think are shot by shot remake is very similar to the original.
We did notice some problems when we was editing the footage we filmed such as the light of the place we filmed being to dark and the camera being not straight. So next time we film as a group we will learn from are mistakes.
Hope you enjoy watching it, because we know we did. :)
-Built in Microphone with an attachment micro phone, to capture clear sound with out this, recording from distance has no sound.
-Switching Off & On
Turn circle dial while holding blue button on the side
To turn on put the circle dial facing ‘ON/STANDBY’
To turn off put the circle dial facing ‘OFF’
IF THE CAMCORDER IS NOT IN USE FOR 5MINUTES+, THE CAMCORDER WILL AUTOMATICALLY SWITCH OFF.
-Battery
To connect battery just slide in to place from right to left , you should hear a clear click.
To eject the battery out of the camcorder just push the button above the battery and simultaneously pull the battery out.
-Record button is with a red line
Push once to Record , we should then see the R on the screen.
Push again after recording footage. This would pause the recording and save what has just been recorder as a separate file on the Memory Card it does not record over files.
-Lens Cover Switch (next to focus ring)
-Auto / Manual shooting mode button ‘AF/MF’.
*MF – Manual Focusing (Focusing Ring would be used for this.) I will not be using this because I will be filming my film opening with auto focus because it would be easier for me to use because the focusing is automatically done.
*AF – Auto Focusing (Focusing Ring will not be used for this)
(To make sure I know what type of focusing I am using I can check the viewfinder to see a green ‘F’ to know I am using full auto focus.)
-Zoom Control
‘W’ Wide – Zooms out
‘T’ – Zooms In
-ND Filter
*If on it means the lighting will be reduced and should on be used on sunny days when filming is done outside. Other wise I should not be using it because it will make my footage dark.
-CAM/MEDIA button
*this button allows me to switch between recording and doing playback.
(The toggle switch on the left allows me to navigate and select)
Video Drive
The video drive is where I save the footage I have taken from the camcorder that has been saved on the SD Card to the drive on the computer so my footage does not go missing.
Tripod
-Connecting Camcorder
1.To connect camcorder to tripod push red button on the side of the tripod
2.slot the front of the camcorder in to the tripod for the back of the tripod (while holding red button)
3.Then tighten the dial at the opposites side of the tripod from the red button to make sure the camera is tighten in to place and does not wobble while filming footage.
-Changing height of Tripod
Unclip the clips seen on the tripod
Pull legs down or up
The clip the clips again when happy with the height
(To know if the tripod is all at the same level look at the sprit level green liquid seen on tripod behind the camcorder and if the bubble is outside the circle the tripod is not all at the same level and if the bubble is inside the circle the tripod is all at the same level)
-Tilt Adjustment
To adjust the tilt unlock the dial on the side of the tripod and move it to the poison of the tilt you want and the lock the dial by spinning it the other way you did to unlock it till it is tight so it doesn’t move poison while filming
-Pan Adjustment
To do panning and adjust it move a clip under the camcorder to the other side and the move the camcorder by moving handle on the side of the tripod.
Memory Card (SDHC Card)
Memory card is inserted at the button of the camcorder (there is 2 slots for 2 different memory cards)
To insert memory card push card into slot (look at image on the camcorder for help) till click sound is herd.
To take out push the memory card inside again and it should come out by it self.
WHAT I SHOULD NOT BE DONE BY EITHER ME OR YOU! READ VERY CAREFULLY .
Menu setting must not be changed... so don't do it.
take great care of equipment , think of it has your own. do not take camera out if it raining really heavily ; however if it is just drizzling go to media apartment and they will give you an umbrella.
check equipment before leaving the class to do filming , make sure battery is full etc.
bring back equipment back on time!
common sense do not leave liquids or drink next to camera , however common sense really isn't that common so yeah LOL.
FINAL RULE , PLEASE DO NOT PRODUCE WORK OF POOR QUALITY WHEN RECORDING WITH CAMERA ;)
HERE IS A QUICK VIDEO INTRODUCTION TO USING A CAMERA ANY TYPE ; VERY RELEVANT CHECK IT OUT...
Group 24 is made up of Me, Susan, Myles and Michael (:
We all have our talents such as i love acting drama queen, Michael is a DJ, Myles our very own sales young gentlemen, Susan our Queen Blogger. We like helping each other which is very good because were in it as a team.
Soon be uploading some group pictures.
Turn circle dial while holding blue button on the side
To turn on put the circle dial facing ‘ON/STANDBY’
To turn off put the circle dial facing ‘OFF’
IF THE CAMCORDER IS NOT IN USE FOR 5MINUTES+, THE CAMCORDER WILL AUTOMATICALLY SWITCH OFF.
-Battery
To connect battery just slide in to place from right to left.
To eject the battery out of the camcorder just push the button above the battery and simultaneously pull the battery out.
-Record button is with a red line
Push once to Record
Push again after recording footage. This would pause the recording and save what has just been recorder as a separate file on the Memory Card.
-Lens Cover Switch (next to focus ring)
-Auto / Manual shooting mode button ‘AF/MF’.
*MF – Manual Focusing (Focusing Ring would be used for this.) I will not be using this because I will be filming my film opening with auto focus because it would be easier for me to use because the focusing is automatically done.
*AF – Auto Focusing (Focusing Ring will not be used for this)
(To make sure I know what type of focusing I am using I can check the viewfinder to see a green ‘F’ to know I am using full auto focus.)
-Zoom Control
‘W’ Wide – Zooms out
‘T’ – Zooms In
-ND Filter
*If on it means the lighting will be reduced and should on be used on sunny days when filming is done outside. Other wise I should not be using it because it will make my footage dark.
-CAM/MEDIA button
*this button allows me to switch between recording and doing playback.
(The toggle switch on the left allows me to navigate and select)
Video Drive
The video drive is where I save the footage I have taken from the camcorder that has been saved on the SD Card to the drive on the computer so my footage does not go missing.
Tripod
-Connecting Camcorder
1.To connect camcorder to tripod push red button on the side of the tripod
2.slot the front of the camcorder in to the tripod for the back of the tripod (while holding red button)
3.Then tighten the dial at the opposites side of the tripod from the red button to make sure the camera is tighten in to place and does not wobble while filming footage.
-Changing height of Tripod
Unclip the clips seen on the tripod
Pull legs down or up
The clip the clips again when happy with the height
(To know if the tripod is all at the same level look at the sprit level [green liquid seen on tripod behind the camcorder] and if the bubble is outside the circle the tripod is not all at the same level and if the bubble is inside the circle the tripod is all at the same level)
-Tilt Adjustment
To adjust the tilt unlock the dial on the side of the tripod and move it to the poison of the tilt you want and the lock the dial by spinning it the other way you did to unlock it till it is tight so it doesn’t move poison while filming
-Pan Adjustment
To do panning and adjust it move a clip under the camcorder to the other side and the move the camcorder by moving handle on the side of the tripod.
Memory Card (SDHC Card)
Memory card is inserted at the button of the camcorder (there is 2 slots for 2 different memory cards)
To insert memory card push card into slot (look at image on the camcorder for help) till click sound is herd.
To take out push the memory card inside again and it should come out by it self.
WHAT I MUST, SHOULD & SHOULD’NT DO!
I should not change the menu settings!
I should look after the equipment with my life!
I should check equipment before leaving the class to do filming!
I must bring back equipment back on time!
I must not put any form of liquid next to equipment!
Many conventions of film openings were seen in the film openings of the films Alfred Hithcock’s ‘Psycho’ (1960), Danny Boyle’s ‘Trainspotting’ (1996) and ‘Goodfella's’ (1990) that I watched in class.
(Conventions of a film opening are methods / things which have been done to establish it is a film opening.)
The conventions of film openings are:
·Credits / Title Scene:
Title scenes are used in Goodfella's and Psycho which show the film title, key production (e.g. director) and cast members of the film to the audience.
The Production Company logo is shown in the title scene (such as Paramount, Waner Bros. Pictures and Universal) as well as the Distribution Company logo. It is usually the first thing the audience sees in the title scene before the title, key production and cast.
Transitions:
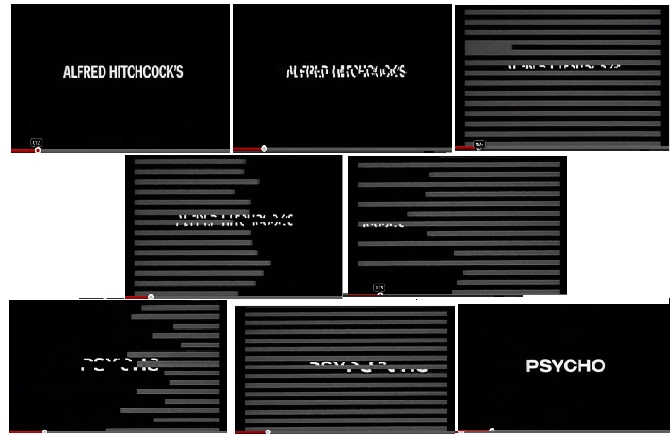
Are used to show the text (mainly in the credit / title scene). The transitions and sounds (non-diegetic sound) used for the transitions usually is linked to the type of genre of the film. So it gives the audience at the start of the film an idea of the film and it also helps set the mood and tone of the film.
The video above for Goodfella's show the transitions for the title. The sound used during the title ‘cars zooming’ is imitated by the titles as if they were the cars zooming. The image above shows the transitions in the film opening of the film Psycho.
·Key Locations are established
Location / establishing shots and extreme long shots are used as well as panning to establish key locations that may be important in the film and gives the audience an idea of the place were the film is meant to be set.
In Psycho an establishing shot was done
Some aspect of narrative is set up
·Some aspect of narrative is set up so the audience has an idea what is going on and who characters are.
This is usually a voice over that is monologue.
This is shown well at the start of Trainspotting.
Usually introduces the key characters
Key Characters are introduced so the audience knows the names and who to look out for in the film. The characters names can be shown / told by narrative, text, freeze frames and many more.
·Hooks audience into film
Dramatic / Fast Music (or music that fits the genre of the film) hooks the audience into film at the opening so the film has the audiences attention at the start of the film. The fast violins in Psycho built up tension and suspense so it hooking in the audience and had there attention. This can be seen in the video link above for Psycho.
·Mood & Tone of film is established
Music and pace (speed of edits) is used to help set up the mood and tone of the film. It makes audience think about the genre of the film like how scary it is or when is it going to make then jump.